Over the last few weeks, we have learned that Cambridge Analytica paid to gain private data on more than 50 million Facebook users. This information was then given to Donald Trump’s campaign during the 2016 presidential election to create targeted ads, appeal for fund-raising, and make predictions on voter turnout.
Because this major breach of user privacy has made headlines, it serves as a resonating reminder that your activity on Facebook is not as private as you think. All too often, users are not aware that their personal information is being mined to gain intelligence on the public.
That begs the question, can you have privacy on Facebook? Without deactivating your account, complete privacy cannot be a guarantee, but there are ways to strengthen the security of your private information. Here is an in-depth guide to improve security settings on Facebook:
How to Begin
- Once you are logged into your account on Facebook, access your settings by moving your cursor to the small arrow in the top right corner of your screen.
- Click “Settings” toward the bottom of the drop-down menu.
- This will bring you to a page with multiple sections in the Settings menu.
Privacy Settings
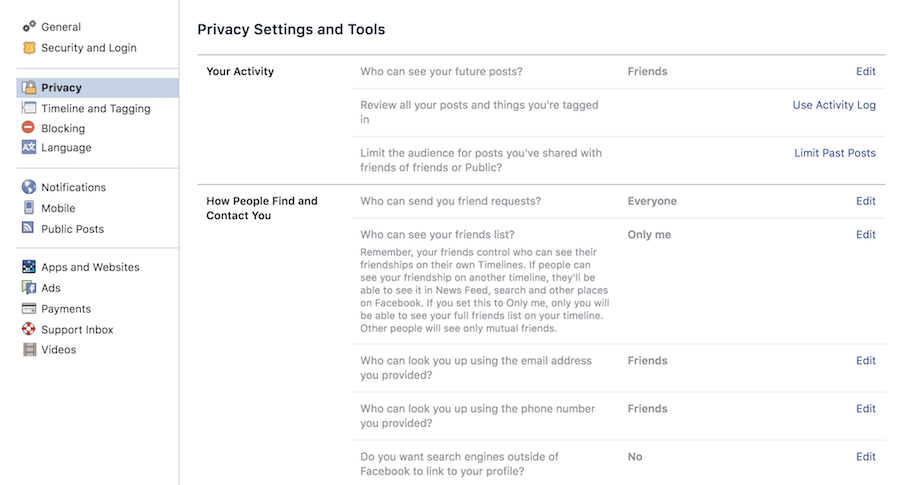
From this point, go to the section titled “Privacy”. In the Privacy settings, you can control who sees your activity, your basic information, and who can contact you.
Your Activity
In this part of the Settings menu, you will be able to make changes to ensure that past and future posts are not visible to unwanted parties.
Who can see your future posts? Choose the appropriate audience on the right-hand side that fits your preferences:
- Public: This means everyone can see your posts.
- Friends: This means only your friends list can see your posts.
- Friends, Except: This means your friends list can see your posts, with the exception of specific people.
- Only Me: This means only you can see your posts.
- Custom Audience
Review all your posts and things you’re tagged in.
- Click “Use Activity Log”. This will take you to the Timeline Review page.
- Click the small settings symbol in the top right. A window will pop up.
- In the drop-down menu on the right, make sure “Enabled” is chosen. This helps you control what posts you’re tagged in will be allowed on your timeline. It is important to note that posts you are tagged in will still appear in searches and people’s News Feeds.
Once completed, go back to your Privacy settings to continue.
Limit the audience for old posts on your timeline. On the right-hand side, choose “Limit Past Posts”. Facebook explains, “If you choose to limit your past posts, posts on your timeline that you’ve shared with Friends of friends, and Public posts, will now be shared only with Friends. Anyone tagged in these posts, and their friends, may also still see these posts.” That being said, in order to change who can see a specific post, you must go to that post and manually choose a different audience.
How People Can Find and Contact You
Who can send you friend requests? Choose the appropriate audience on the right-hand side that fits your preferences:
- Everyone: Anyone can send you friend requests.
- Friends of Friends: Only people with mutual friends can send you a friend request.
Who can see your friends list? Choose the appropriate audience on the right-hand side that fits your preferences:
- Public: Anyone can see your friends list.
- Friends: Only your friends can see your friends list.
- Friends, except: Only your friends can see your friends list, with the exception of specific people.
- Only me: Only you can see your friends list.
- Custom Audience
Who can look you up using the email address provided? Choose the appropriate audience on the right-hand side that fits your preferences:
- Everyone: Anyone can see your email address on your profile.
- Friends of Friends: Only people with mutual Facebook friends can see your email address on your profile.
- Friends: Only friends can see your email address on your profile.
Who can look you up using the phone number you provided? Choose the appropriate audience on the right-hand side that fits your preferences:
- Everyone: Anyone can see your phone number on your profile.
- Friends of Friends: Only people with mutual Facebook friends can see your phone number on your profile.
- Friends: Only friends can see your phone number on your profile.
Do you want search engines outside of Facebook to link to your profile? Choose “No” if you do not want search engines linking your profile in their search results.
Timeline and Tagging Settings
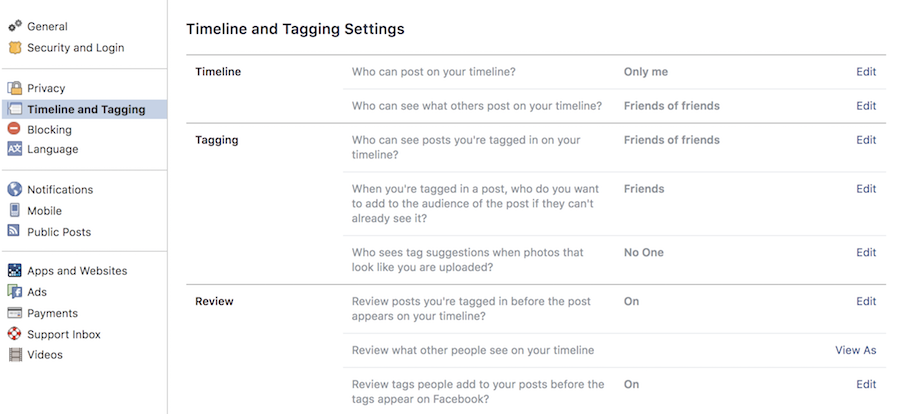
Timeline
In this section, you can control who is able to post on your timeline, be it “Friends” or “Only Me”. Additionally, you can choose who sees the posts on your timeline. Choose the appropriate audience on the right-hand side that fits your preferences:
- Public: Anyone can see your posts on your timeline.
- Friends: Only your friends can see your posts on your timeline.
- Friends, except: Only your friends can see your posts on your timeline, with the exception of specific people.
- Only me: Only you can see your posts on your timeline.
- Custom Audience
Tagging
Who can see posts you’re tagged in on your timeline? Choose the appropriate audience on the right-hand side that fits your preferences:
- Public: Anyone can see posts you’re tagged in on your timeline.
- Friends: Only your friends can see posts you’re tagged in on your timeline.
- Friends, except: Only your friends can see posts you’re tagged in on your timeline., with the exception of specific people.
- Only me: Only you can see posts you’re tagged in on your timeline.
- Custom Audience
When you’re tagged in a post, who do you want to add to the audience of the post if they can’t already see it? Choose “Friends”, “Only Me”, or “Custom” as appropriate to control who can see these posts in their searches and News Feeds.
Who sees tag suggestions when photos that look like you are uploaded? Facebook explains, “When a photo that looks like you is uploaded, we’ll suggest adding a tag of you.“ Choose between “Friends” or “No One”.
Review
Review posts you’re tagged in before the post appears on your timeline? For best security, it is recommended this feature is turned “On”. This should already be enabled from the previous step “Review all your posts and things you’re tagged in”.
Review what other people see on your timeline. This gives you the opportunity to preview your profile as different audiences to ensure that the privacy of your information matches your preferences.
- On the right-hand side, click “View As”. This will take you to your profile as it looks to the public.
- To see what it looks like to a specific person, click “VIew as Specific Person” at the top of the page.
- Type in the person’s name and your profile will change to exactly what they are able to see.
Once completed, go back to your Timeline and Tagging settings to continue.
Review tags people add to your posts before the tags appear on Facebook? For best security, make sure this is on by clicking the right-hand side and choosing “Enabled”.
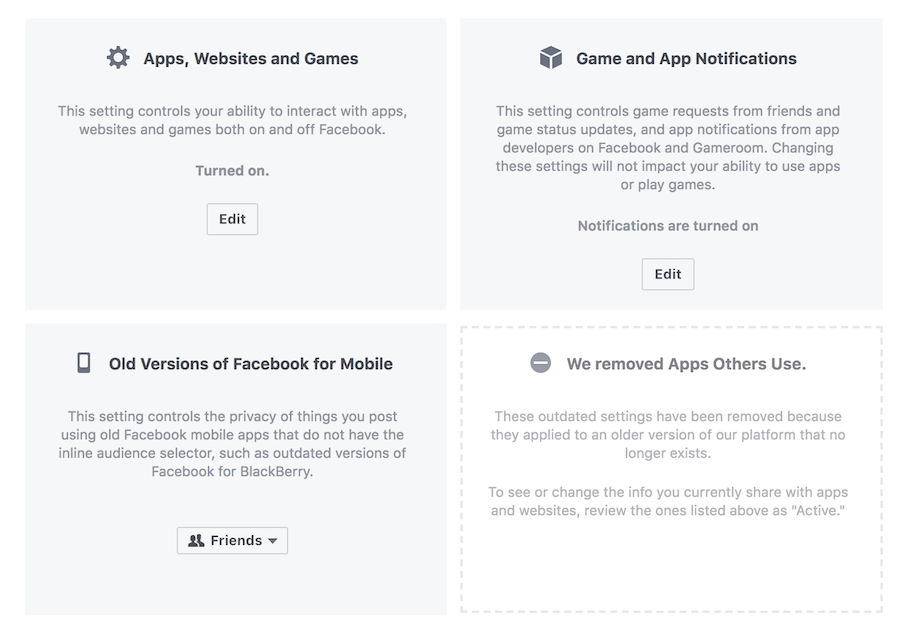
Apps and Websites Settings

Adjusting your app settings is among the most important in this guide to improve security settings on Facebook. A major way Cambridge Analytica was able to gain intelligence on Facebook users was through apps, namely personality quizzes. While these types of games and quizzes seem like a harmless way to pass the time, researchers are able to gather private information this way from your profile. Ultimately, nothing is free and to input data about yourself is to give it away, especially in the case of third-party apps.
The Apps settings section shows you:
- The active apps and websites connected to your Facebook profile where you use Facebook to log in.
- If the feature to interact with apps, websites, and games connected to Facebook is on or off.
- Game and App notifications
Because external apps can access so much data about you from Facebook, it is crucial to review the permissions you have given to each app, such as:
- Disabling posting on your behalf.
- Declining intrusive apps and permissions you may have allowed in the past.
- Disconnecting apps you do not remember allowing to have access to your Facebook.
After going through these settings, your privacy on Facebook will be more secure and you have reduced the risk of vulnerability to data breaches.